Remember that heart-stopping moment when the bass drops, and your headlights dim along with it? It's a frustrating experience, especially when you've invested in a killer sound system. But don't despair, gearheads. There's a solution, and it involves a deceptively simple component: the capacitor.
Think of your car's electrical system like a highway. The battery is the main power source, providing juice for everything from the engine to the infotainment system. When you crank up the volume, your amplifier demands a surge of power to reproduce those deep, thumping bass notes. This sudden demand can overwhelm the electrical system, causing voltage drops that lead to dimming headlights, distorted sound, and even potential damage to your amplifier. That's where a car audio capacitor comes in, acting like a reservoir of stored energy, ready to deliver a quick burst of power when your amp needs it most.
Before you start tearing into your dash, let's talk about getting the most out of your ride. A little preventative maintenance can go a long way in avoiding electrical issues in the first place. Make sure your battery terminals are clean and corrosion-free, and consider upgrading to a high-output alternator if you're running a particularly power-hungry audio system. This will ensure a stable voltage supply to begin with, making the capacitor's job even easier.
What is a Car Audio Capacitor?
A car audio capacitor, often referred to as a stiffening capacitor, is an electronic component designed to store electrical energy and release it quickly when needed. In the context of a car audio system, it acts as a buffer between the battery and the amplifier. Its primary function is to provide a stable and instantaneous supply of power to the amplifier during demanding musical passages, preventing voltage drops and ensuring optimal performance. Essentially, it bridges the gap between the battery's power delivery and the amplifier's sudden power needs. Without a capacitor, the amplifier has to draw directly from the battery, potentially causing voltage fluctuations that can impact the sound quality and even damage the equipment.
Capacitors are rated in Farads (F), with typical car audio capacitors ranging from 0.5 Farads to 2 Farads. A general rule of thumb is to use approximately 1 Farad per 1000 watts of amplifier power. However, it's always best to consult with a car audio professional to determine the appropriate size capacitor for your specific system.
The benefits of using a car audio capacitor extend beyond simply preventing dimming headlights. They also contribute to: Improved Sound Quality: By providing a stable voltage supply, the capacitor ensures that the amplifier can reproduce sound accurately, resulting in clearer highs, tighter bass, and overall better fidelity. Increased Amplifier Lifespan: Voltage drops can put a strain on the amplifier, potentially shortening its lifespan. A capacitor helps to protect the amplifier by providing a consistent power supply. Enhanced Bass Response:The capacitor allows the amplifier to deliver more power to the subwoofers during bass-heavy passages, resulting in a deeper and more impactful bass response.
Why Do Headlights Dim When the Bass Hits?
The dimming of headlights when the bass hits is a classic symptom of voltage drop in the car's electrical system. When your amplifier demands a large amount of power to reproduce low-frequency sounds, it draws a significant current from the battery. This sudden draw can cause the voltage to dip below the required level, affecting other electrical components, including the headlights. The capacitor acts as a local power reserve, providing the amplifier with the necessary current surge without relying solely on the battery.
Are Capacitors the Same as Batteries?
No, capacitors and batteries are not the same, although they both store electrical energy. Batteries store energy chemically and release it slowly over a longer period. Capacitors, on the other hand, store energy electrostatically and can release it much faster. Think of a battery as a long-distance runner and a capacitor as a sprinter. A battery provides sustained power, while a capacitor provides a quick burst of energy.
How to Install a Car Audio Capacitor: A Step-by-Step Guide
Installing a car audio capacitor is a relatively straightforward process, but it's crucial to follow safety precautions and take your time. Before you begin, disconnect the negative terminal of your car battery to prevent any electrical shocks or damage to your system. Here's a step-by-step guide:Tools and Materials You'll Need:
Car audio capacitor
Screwdriver set
Wire stripper/cutter
Ring terminals
Fuse holder and fuse (same amperage as the capacitor's rating)
Remote turn-on wire
Voltmeter
Heat shrink tubing (optional)
Step 1: Choose a Mounting Location
Select a mounting location for the capacitor that is close to the amplifier, ideally within 12 to 18 inches. Ensure the location is dry, protected from the elements, and allows for proper ventilation. Secure the capacitor using screws or mounting brackets, ensuring it's firmly in place.
Step 2: Connect the Ground Wire
Connect a short, heavy-gauge ground wire from the capacitor's ground terminal to a clean, bare metal ground point on the car's chassis. Ensure the ground point is free of paint, rust, or other debris. A good ground connection is essential for optimal capacitor performance. Use a ring terminal on the end of the wire and secure it tightly to the ground point.
Step 3: Connect the Power Wire
Run a heavy-gauge power wire from the car's battery to the capacitor's positive terminal. This wire should be the same gauge as the power wire running to your amplifier. Install a fuse holder as close as possible to the battery, using a fuse with the same amperage rating as the capacitor. This fuse is crucial for protecting the capacitor and your car's electrical system in case of a short circuit. Use ring terminals on both ends of the wire and secure them tightly to the battery and the fuse holder.
Step 4: Connect the Remote Turn-On Wire
Connect the remote turn-on wire from the amplifier's remote turn-on terminal to the capacitor's remote turn-on terminal (if equipped). This wire tells the capacitor when the amplifier is turned on, allowing it to charge and discharge as needed.
Step 5: Charge the Capacitor (Important!)
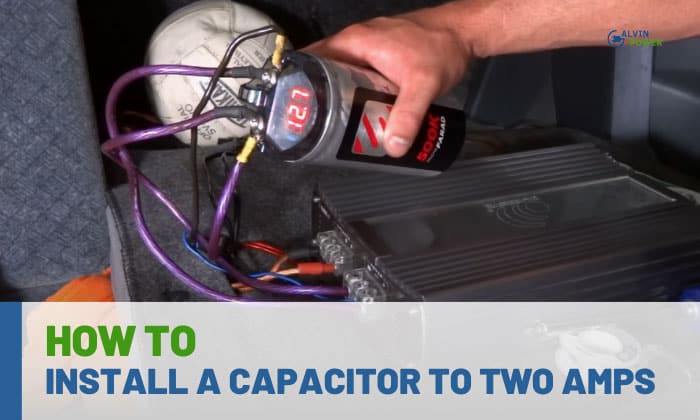
Before connecting the power wire to the capacitor, you need to charge it slowly to prevent damage. Use a voltmeter to monitor the capacitor's voltage as you slowly introduce power.
Connect the positive lead of the voltmeter to the capacitor's positive terminal.
Connect the negative lead of the voltmeter to the capacitor's negative terminal.
Using a resistor (typically around 1000 ohms), connect one end to the positive battery terminal and the other end to the power wire leading to the capacitor. This will slowly charge the capacitor.
Monitor the voltmeter until it reads approximately the same voltage as your car's battery (around 12-14 volts). This may take several minutes.
Once the capacitor is fully charged, disconnect the resistor and connect the power wire directly to the capacitor's positive terminal.
Step 6: Double-Check Your Connections
Carefully inspect all connections to ensure they are secure and properly insulated. Use heat shrink tubing to protect exposed wire connections and prevent shorts.
Step 7: Reconnect the Battery and Test
Reconnect the negative terminal of your car battery and test your audio system. Turn up the volume and listen for any improvements in sound quality and reduced headlight dimming.
Can I Install a Capacitor Myself, or Should I Hire a Professional?
While installing a car audio capacitor is generally a manageable task for experienced DIYers, it's crucial to have a solid understanding of automotive electrical systems. If you're uncomfortable working with wiring or unsure about any of the steps involved, it's always best to hire a professional car audio installer. Incorrect installation can lead to electrical problems, damage to your equipment, or even personal injury.
How Do I Choose the Right Size Capacitor?
As a general guideline, aim for 1 Farad of capacitance for every 1000 watts of amplifier power. However, several factors can influence the ideal capacitor size, including the type of music you listen to, the efficiency of your amplifier, and the condition of your car's electrical system. Consulting with a car audio professional is the best way to determine the optimal capacitor size for your specific setup.
Troubleshooting Common Capacitor Issues
Even with proper installation, you might encounter a few issues with your car audio capacitor. Here are some common problems and how to troubleshoot them: Capacitor Not Charging: If the capacitor isn't charging, check the fuse near the battery to ensure it hasn't blown. Also, verify that the remote turn-on wire is properly connected and receiving a signal from the amplifier. Capacitor Overheating: Overheating can be caused by several factors, including an undersized capacitor, excessive current draw, or poor ventilation. Ensure the capacitor is properly sized for your amplifier and that it has adequate airflow around it. No Improvement in Sound Quality: If you're not noticing any improvement in sound quality or headlight dimming, double-check all your connections and ensure the capacitor is properly grounded. It's also possible that the capacitor is not large enough for your system's power demands. Blown Fuse: A blown fuse on the capacitor’s power wire usually indicates a short circuit. Inspect the wiring for any damage or exposed wires and correct the issue before replacing the fuse.
Driving an Audi is about more than just getting from point A to point B; it's about the experience. It's about feeling the road beneath you, hearing the precise growl of the engine, and enjoying the seamless integration of technology. By understanding the nuances of your car's electrical system and taking steps to optimize its performance, you can elevate your driving experience to a whole new level. Adding a capacitor to your sound system helps ensure that every note, every beat, and every rumble is delivered with the clarity and power it deserves. So, crank up the volume, hit the open road, and let the music move you. Your Audi, and your ears, will thank you.
Posting Komentar untuk "capacitor car audio: What It Is and How to Install"